Nissan Rogue Service Manual: Moonroof motor assembly
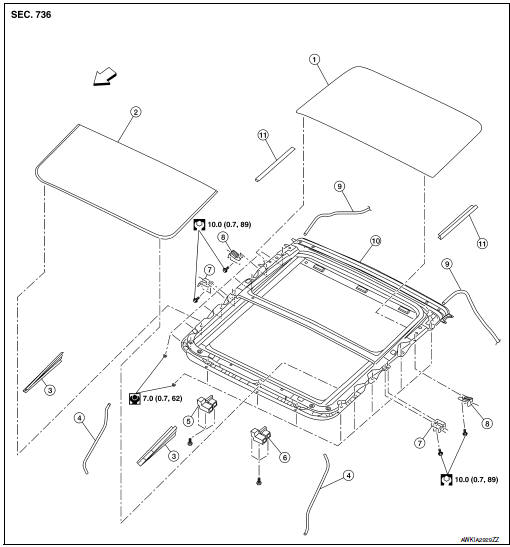
Exploded View

- Panoramic roof glass
- Glass lid
- Side trim covers (LH/RH)
- Front drain hose front (LH/RH)
- Moonroof motor assembly
- Sunshade motor assembly
- Moonroof front bracket (LH/RH)
- Moonroof rear bracket (LH/RH)
- Drain hose rear (LH/RH)
- Moonroof unit assembly
- Rear trim (LH/RH)
 Front
Front
Removal and Installation
REMOVAL
- Close glass lid.
- Remove the headlining. Refer to INT-30, "Removal and Installation".
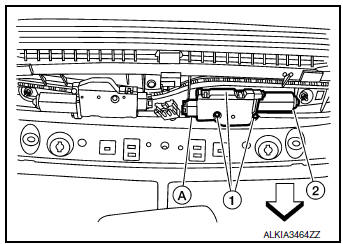
- Remove moonroof motor assembly screws (1).
 Front
Front - Disconnect harness connector (A) and remove moonroof motor
assembly (2) from moonroof unit assembly front end rail.
CAUTION: Do not run the removed moonroof motor assembly as a single unit.

INSTALLATION
- Move moonroof motor assembly laterally little by little so that the
gear is completely engaged into the wire
on the moonroof unit assembly, and the mounting surfaces become parallel.
Install the moonroof motor
assembly screws and tighten.
CAUTION: Before installing the motor, be sure to place the link and wire assembly in the symmetrical and fully closed position.
NOTE: If necessary, insert a suitable tool into the drive key and rotate right or left slightly to assist in complete moonroof motor gear alignment.
- Remainder of installation is in the reverse order of removal.
- Synchronize moonroof motor assembly with moonroof unit assembly. Refer to RF-24, "ADDITIONAL SERVICE WHEN REPLACING CONTROL UNIT : Special Repair Requirement".
 Panoramic roof glass
Exploded View
Panoramic roof glass
Glass lid
Side trim covers (LH/RH)
Front drain hose (LH/RH)
Moonroof motor assembly
Sunshade motor assembly
Moonroof front bracke ...
 Moonroof unit assembly
Inspection
WIND DEFLECTOR
Open glass lid fully.
Visually check for proper installation, damaged/deteriorated components,
or foreign objects within mechanism.
Correct as required for smooth ...
Other materials:
P0132 A/F sensor 1
DTC Description
DTC DETECTION LOGIC
To judge the malfunction, the diagnosis checks that the A/F signal computed
by ECM from the A/F sensor 1
signal is not inordinately high.
DTC No.
CONSULT screen terms
(Trouble diagnosis content)
DTC detecting condition
P0132
A/F S ...
Additional service when replacing ECM
Description
When replacing ECM, the following procedure must be performed. (For details,
refer to EC-136, "Work Procedure".)
PROGRAMMING OPERATION
NOTE:
After replacing with a blank ECM, programming is required to write ECM
information. Be sure to follow the procedure
to perform t ...
Control buttons
Control buttons
The control buttons for the Bluetooth® Hands-
Free Phone System are located on the steering
wheel.
PHONE/SEND
Press the button to
initiate
a Voice Recognition session or
answer an incoming call.
You can also use the button
to interrupt the system feedback
and ...
